Wednesday, September 14, 2011

On movement trays and how I make them

Welcome to another Wednesday post. Today, I will be discussing a topic that I feel is a bit understated in the whole industry and blogosphere - the movement trays.


For WFB players, these are a must. There is simply no avoiding the usage of a 'regiment base' - as the trays were known before GW released the multi-model strips and called those Regiment Bases. Moreover, more and more people magnetize their bases and trays become essential. The 'natural' course of action was to make the trays out of metal - specifically steel - to make the magnets do their job. This worked fine for me as well.

Steel is rigid (duh), it can be cut to extremely precise angles and it can take glue just fine (more on that later). But it has its flaws. First and foremost, the availability. I assume few of us have a steel cutter at hand. For 1mm thick steel in "Warhammer-sized" sheets you can either go to your local metalworks, where, depending on people who work there you can get a ridiculously great bargain from the leftovers bin or walk out empty-handed: such small bits are not normally sold and the company might have a minimum order. Alternatively, you can purchase these from dedicated gaming stores, just not a lot of them carry sheet steel for movement trays. And it can be pricey.

On top of that, steel is heavy. It has sharp edges and corners, so filing is necessary to avoid cuts. Learned that the hard way.

An alternative to steel is a substance called ferrous adhesive tape. As the name suggests, it is and adhesive sheet (of various widths) with metal-like capabilities - chiefly magnetism. It's very handy to work with (just cut and stick), it's light (it's essentially fancy plastic) and it's more widely available than proper metal sheets. It's also more expensive, and since it's not at all rigid, you still need some base for your tray to stick the tape to.

I have tried both of the above and neither worked well for me. Long and hard have I resisted the GW Modular Basing Kit before I bought one just of sheer curiosity.

I was pleasantly surprised. The plastic 'bottoms' are very, very strong, 3 mm thick plastic sheets with 20x20 mm grid on one side and 25x25 mm one on the other. And you get two per pack. It's not a great value, to my mind squeezing a third in there wouldn't hurt anyone, but hey, it's GW. You also get the borders, which are sadly a disappointment.

After gluing them to the sheet, they leave very unsightly gaps between the border and the models' bases. It's 2 mm wide per side, meaning your finished tray will be almost half a centimeter too wide. I managed to fix it thusly:

It's just 2 mm thick cardboard, but it does the job nicely. But to make matters worse, the inner edge of the border bits is NOT perfectly perpendicular to the surface - making some sort of filling necessary.

In addition, if you're making a big tray, say twenty models, you need to glue some 0,5 mm of material under it - after adding the borders, the plate doesn't lat flat against the surface.

Not so good now, hm? Bear with me. I think I can convince you how good this product is yet.

First of all, it's very sturdy and lightweight. 'Nuff said. Secondly, and I think here is where this product's hidden strength lies, is its ability to make custom bases for things like war machines, chariots with more than two beasts, giants, the arachnarok and the like. I will be returning to this in the future and I will show you exactly what I mean.

Now, how do I go about making my trays. I do magnetize all my models and to avoid having to stick anything more on the already thick base plate, here is what I did:

I simply drilled through the whole base plate with a 3 mm drill. The plate is 2 mm thick, exactly the height of the magnets I use. To make them align perfectly with the magnets under the bases, I clamped the bases (one at a time) to the tray and carefully marked the spot. To prevent the magnets from falling out of the tray and to give them more material to glue to, I reinforced the tray with a sheet of 0,5 mm polystyrene.

It is a time consuming project at first, but once you get the hang of it, it goes very smoothly. I built the tray above, from cutting the components to painting, in one evening.

That's a wrap. See you on Saturday, when I'll be showing some painted minis!

Saturday, September 10, 2011

Along came an arachnarok

Have you guessed today's sponsor? Of course you did.

The Arachnarok Spider kit is, to my mind, the best product GW has put on the shelves. It is very fun to assemble and paint, it is insanely detailed (and I mean insanely) and it is, well, BIG. I've grown accustomed to big sci-fi models, but fantasy ones of this size are still "new".

I don 't have any WIP shots anymore, but I shall be making another spider in the future and I will document the process. As you can see, I've altered the pose somewhat. What is being proposed by the design doesn't ring well with me - I can't imagine all this huge mass of plastic being held in four tiny places. Hence, the solution:

The eggs in the tree stump in fact conceal a 2,5mm brass rod holding the whole thing much more firmly. I've made a profound use of the airbrush on this little spideress (yes, it's a she!) and i sincerely recommend the model to anybody who wants to start airbrushing as well. You can go as simple (as I did) or as elaborate as you please, the model really offers possibilities for both. Just be careful of some nasty gaps that need to be filled and sanded very, very smoothly. Take your time on them.

 The model is not without its flaws, mind you. The carapace can't be properly glued, filled and sanded before attaching it to the main body. This makes the airbrushing somewhat problematic - you have to mask the body very, very well to avoid surprises. Luckily, you can paint the "flesh" before attaching the main carapace. However, I recommend constructing the two smaller pairs of mandibles and the whole head bit on the body, then filling the gaps (they don't fit as well as you might expect), sanding the joints smooth and painting the thing. Here good masking is absolutely crucial.
The goblins and the howdah will probably be your most time-consuming step. Not everything fits perfectly here, good glue and some clever clamps are essential. But most of all the sheer mass of detail can be overwhelming. All these twigs, spider web, string, bones, feathers, shield and, of course, skulls will require time to look decent.

The goblins are probably my favorite bits here. All are very characterful, with very natural poses, well-detailed bits and generally are a big step forward. I purposefully left over the shaman and some other crew...
...plus the upgrades like the flinger for a future project. The only thing left to do here are the tiny spiders, which will go on the base to liven it up a little.
 As a final word, thanks to Sigmar of Warhammer Battle Reporters for making the spider a poster child for his latest forum project.

Till next time!

Wednesday, September 7, 2011

Thought I was dead, didya?

Well, I kinda was. I'm not gonna apologize for my absence, I had my reasons for it and that is all I can say. I don't generate much traffic anyway, but still, I hope I haven't disappointed any of my readers.

So, what is new. First of all, my other project, the Greenskin Kultur blog, is as of now terminated. I simply don't have enough material for the orcs alone to constitute a completely separate blog. Ironically enough, my current projects are almost exclusively greenskin in nature. But don't fret, everything will be posted here.

Secondly, I really want to have a second shot at blogging, to be disciplined and dedicated enough to post regularly, if not super-frequently.

So, to kick start things, here is a finished hydra. Only recently I managed to add the last two heads and necks.
Next time you'll see some of my current greenskins projects, enjoy!

Monday, November 15, 2010

WIp Hydra, part six.

Bow to me faithfully!


Aside from the beastmasters, only greenstuffing the necks bit is left to be done.


I know I said three heads previously, but I'm honestly thinking about adding two more, as it in fact should be.


Bits for the beastmasters are in transit and should be arriving shortly. Nothing super-fancy, but still, I have pretty good idea for the handlers.

Until next time.

Tuesday, November 9, 2010

WIp Hydra, part five

Is it perseverance? Is it, perhaps, being fed up with this project and the desire to finish it ASAP? I sincerely do not know. But the fact remains that I'm getting closer and closer to finishing the beast.


I've added all the spikes and ridges it needed, which leaves me with only the necks and heads to do. And of course the beastmasters to goad it, but that's another story.


I'm also going to add something to liven up the base a bit. Dont' know what exactly, but definitely something, the base looks kinda dull and static to me at the moment.


Well, there you have it. The necks bit is assembled, primed and I'm starting to paint it momentarily. I'm very happy to be on the final straight with this project and would love to hear your thoughts.

Until next time.

Sunday, October 31, 2010

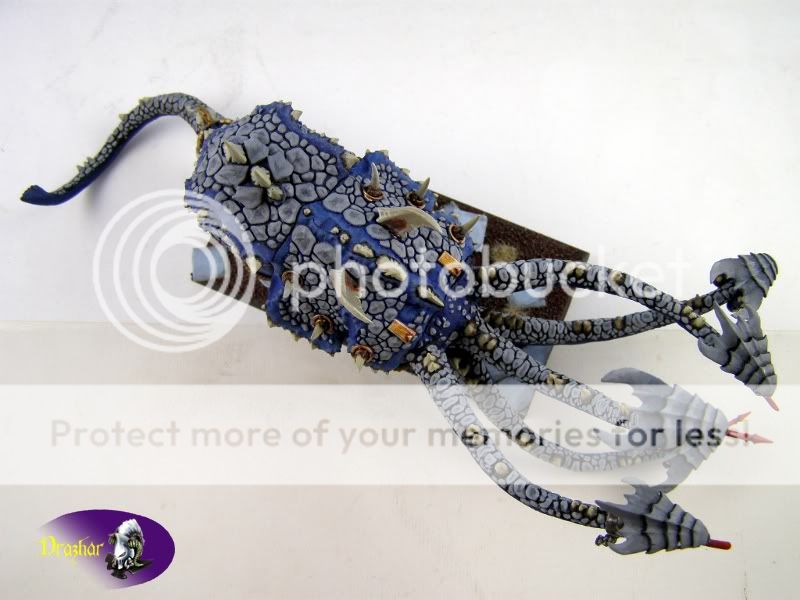
The Unspeakable WIP Cthydra, part four

Here it is, going together more and more. All the necessary bits and pieces are in a nice littles foil bag on my desk, patiently awaiting their turn to contribute to my most ambitious project to date. Here are the latest pictures form the beastmasters' pens.


I've made a little boo-boo with the tail. It is too low and actually lifts the entire mini. I can't fix it without serious damage to the hydra, so we'll see how it goes.

I've said it before, I'll say it again - the stegadon kit is awesome. It is simply massive. It dominates the collection. I can't think of how imposing it looks with the howdah. Pure power and awe packed into multi-part plastic kit. The only thing missing is the anatomic correctness.


By the time I write this, the larger back plate will also have been finished and glued on. I'm just sitting to the freshly-undercoated smaller plate.

And in case you were puzzled by the post's title, here is the explanation:

I write like
H. P. Lovecraft
I Write Like by Mémoires, journal software. Analyze your writing!


I could not be more proud if I won the Pulitzer. Writing is something I enjoy aside from painting and such praise is just great, even if it comes from a silly piece of code on a silly website.

See you next time.

Monday, October 25, 2010

Tavern Talk - One Army or More?

And welcome back.

Normally I'm not that interested in the Tavern Talk topics Kuffy sends us. No disrespect mate, it's valuable work you do, but I can't help the feeling lots of issues have been discussed previously. This one, however, is different, different enough to catch my interest and get me to write. Besides, it is my vow to make a conscious effort to update more frequently than I used to, so here it is.

Let me start with quoting the question raised:
As I am sure we all know, when one picks up the game of Warhammer it is followed shortly by a choice of army.  This is usually a single army which is then built to make a decent list which will be used a lot.  And then to be followed by an expansion to include a few more options for future games.  However, who stays with a single army?  Once you have played one for a while, does it become boring until you branch out to another?  Or, do you stick to a single army?  There are merits to having one major army and to having a number of smaller ones.  What do have and why? 
As most of my esteemed readers know, I own and develop three armies, chronologically Orcs and Goblins, Vampire Counts and Dark Elves. All are sizable,  I can safely assume I can field three to four thousand points of each force if I ever bothered to game again, especially per the eighth edition composition rules.

So, was I bored with any of these? No. Was the reason to get the new army the tediousness and wear of another force? I don't think so. So what was it?

It was the idea. A cogent, well established idea for an army, followed by a selection of a force that would fill this concept. With orcs, I pursued a forest theme mixed with liberal use of the color red. With the vampires, I wanted a dark, almost monochromatic color scheme with a prominent inclusion of old, out-of-production miniatures (I'm looking at you, armored skeletons) and "classic undead" feel. With the dark elves, I went for neat and crisp color scheme with unusual colors, lots of conversions and, just for the fun of it, as many plastic models as possible.

And the druchii are just plain kickass awesome. Taking my character and outlook on life into account, if I wasn't a human being, I'd be a druchii. Or a dark eldar.

Now, there are problems with having more than one army. Most notably, if you're planning to have multiple forces, think about whether or not you have the room to accommodate them in your bedroom or study. Secondly, if unlike me you game with them, take into account the transportation of your beloved minions. Is your current carry case up to the task of transporting completely different force? Think skaven vs. ogres. Or Bretonnia vs. the lizardmen. These contain models that tend to be very different in terms of size and shape. Keep it in mind when expanding your collection.

There you go. Thoughts on multiple armies by a multiple-army kinda guy.

And in case you were wondering, yes, I am planning further armies after I finish the ones I have completely.

Until next time.