Friday, November 11, 2011

Mangler Squigs - the base

Hello again.

Today I want to show you my newest project, the mangler squigs. I know the models proper come out in December, but I started this before I knew they were actually making models for these. Moreover, I figured that I can easily make my own 'count-as' for something so random with the models I already have...

...like the extra trees from the arachnarok kit. For anybody making any kind of forest
project - I sincerely recommend you pick these up from you favorite bits supplier. If you're not a fan of spider webs these can be easily cut away and I can't help thinking they made them like that on purpose. Mine of course still need work.

The tree is airbrushed and glazed. I think I finally managed to find a glaze formula that works. I really need somebody to show me how a glaze is supposed to look like; I'm the kind of person who learns by imitation and observation, much less from instruction.
The base is done with my usual basing scheme for the orcs. And I've just realized there is not a single orc in my army yet...
I also tried some highlighting on the ferns. It was actually more like shading - there is just one color I used here, namely Dark Angels Green. The center of each frond has simply more layers of paint. I find this effect very much to my liking.

That's a wrap for today. My country is actually celebrating Independence Day today and I'm off to celebrating as well. See you on Monday!

Thursday, November 10, 2011

On armies and themes

Welcome. I know it's late, but my day was so terribly idle and discomposed I only brought myself to updating now. I hope you can forgive me.

What I wanted to talk about today were armies and specifically themed armies; and let's face it, who does not do a themed army? Is it even possible to make an army that is a haphazard collection of miniatures from the same army list and still call it a playable force?

To me, theme is put in an army just by the sole fact of using a limited palette of colors throughout the force. It doesn't of course have to end here and it usually does not, but sometimes it's just that: an army is 'themed' by being painted by the same person, using the same techniques and the same style of basing, even if it's just sand and static grass glued to the bases. And this is fine.

Some of us go more or less further. Be it basing (the abundance of resin bases and basing products has made it very tempting to try), or unified color scheme (with armies like the Empire, the high elves, Bretonnia or even the vampire counts it is not only possible, but strongly suggested to make your force coherently dressed), or both, as is most often the case, very many gamers really sit down and think how their force is going to look like and what colors, techniques and materials they're going to need. And this is fine.

Still others really go nuts over their themes. I'm talking about naming their commanders, actually writing pieces of fiction about them or their armies and going insane over the conversions. If such people have the skills to match their plans, what you get in the end are forces that stick in any viewer's mind forever. And this is also fine.

However (you knew something was coming), there are some hobbyists who just can't stick with one fictional world at a time. Who mix Dungeons & Dragons with Warcraft, Middle-Earth with Westeros and the Imperium of Man with Narnia. And that is not at all fine.

Don't you catch my drift? Haven't you ever heard something like
I really wanted to style my dark elf force as the drow from the Underdark!
This is not OK. Warhammer is not a D&D setting nor does it have drow as you know them from Baldur's Gate or whatever. The races in our beloved game are, despite what haters will have you believe, quite well-established as far as fable is concerned and the world really offers plenty of scope to experiment and come up with a them that is purely your own. For the first time since a long time Games Workshop has not only acknowledged the existence of such old gems as Araby, the Kingdoms of Ind, Cathay or Nippon but actually seems to be giving the unexplored parts of the world a nod of approval. There is simply no explanation for such mixing of settings.

Or another gem:
Why don't I make my necron force steampunk-themed? With top hats! And whirlygigs for guns!
 Because  it's Warhammer 40.000 and it is not a steampunk setting. Nothing in my mind makes an effort less worthy than such things. Want to play steampunk (and with it being SO fashionable and 'in' right now, why wouldn't you? It's not that you by definition engage in escapist hobbies that tend to drift away from concepts of "fashion"... oh wait, you do!)? Then there are so many possibilities! SMOG 1808 is one, with miniatures that regularly put me into gorgeousness-induced coma. Or Dystopian Wars. Just not Warhammer. Warhammer is dark fantasy - and 40k is too by the way, given the literary definition of 'dark fantasy'. It has nothing to do with any other fantasy setting.

"But wait" - I hear the screams. - "Such things only prove how creative some people are"! And I can just answer "no". This is not creativity. This is striving to be "original" at any cost and has nothing to do with creativity. Being creative is being able to make something original and unique, but without breaking certain constraints and guidelines - in our case, the system's setting. Putting top hats on ancient, sinister synthetic life forms does not make for a creative effort. It just makes for a wasted effort. I'm sorry, but that's the harsh truth.

There. I know it was not a pleasant read but at least it has the benefit of being true to what I think. And I suppose I'm entitled to an opinion after being in the hobby for at least fifteen years.

See you on Friday!

Monday, November 7, 2011

Rebasing the arachnarok, part three - water pool and more details

Welcome!

The rebasing project is going more smoothly than I'd imagined and this is the penultimate update on it. Remember the details I posted last week? Here they are 'applied':


They of course needed to blend into the base more smoothly, but that was minor work in comparison with the whole project. In addition, I was happy to see the pool apparently didn't need more than one or two layers of Still Water to look decent.

I'm thinking about adding some orange clump foliage to the base in very small pieces, to represent fallen leaves and dry scatter.If I manage to get some that is cheap I'll definitely give it a go.

In the meantime, thanks for looking and see you on Wednesday.

Friday, November 4, 2011

Product review - Vallejo Still Water

It's Friday, Friday, gonna get down on...

Ahem.

Before we start with the review, I'd like to inform my esteemed readers that I'm changing the update schedule for this blog from two updates a week to three. We'll see how it goes, it's just an experiment in motivation and working to deadlines. So, from now on, expect updates on Mondays, Wednesdays and Fridays.

I've decided to review the Vallejo Still Water for two reasons: I haven't seen much buzz about it in the blogosphere (and I just had to risk it when I bought it) and I'm using it right now on my arachnarok base. So here it is.

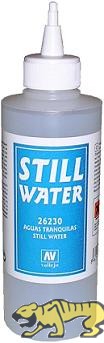
This is our subject. It comes in a 200 ml plastic bottle with an applicator. It ships sealed tight. It's clear, colorless and odorless. From the technical point of view, it's a water-based polyurethane dispersion.

How do you use it?
Quite simple really - you just pour it straight from the bottle onto whatever you want your water to be in. Right? It says so on the bottle, must be true.

It's not.

The hole you get after you cut off the seal is much too big for anything smaller than monster bases. If you want more control over the flow (and you do), apply it with a large sewing needle or a toothpick. The liquid is viscous enough to allow it. I got around the spillages by gluing a syringe needle onto the bottle and it worked perfectly. So far so good.

How exactly does it work?
Firstly, what is very tempting about this product is its simplicity. It's a one-part dispersion, whereas other model water products are mostly two-part resins. Moreover, it says on the bottle that this product "extends and levels by itself". What could be better, right?

Wrong.

While it does level, it does not extend; it's not insulation foam. Quite the contrary, it actually contracts like holy hell, which is the major disadvantage of this product. After it dries, what you get is like a U-shaped basin with recessed center. This, however, is actually an advantage in my book. Look at this picture:
The 'rim' of the pool has already dried and it's crystal clear. Its level is higher than the wet, milky center due to the Still Water's extreme surface tension. Now, when I said "advantage", I meant that when you pour it all over, you instantly get the 'rims' of your water area defined and you're very unlikely to spill it where you don't want it.

And what do you do about the basin shape? Simple - pour another layer! By using multiple thin layers you will eventually get the desired depth in your water.

Secondly, remember to use it after you have varnished your project! Otherwise your water will be matte...  And here is another major caveat - if you want a deep water ('deep' meaning more than just some spill on the floor) you simply have to use multiple layers. Now imagine yourself finishing a project, you have only the water left to do. You'll need, say, five layers of VSW and you'll have to wait at least 12-15 hours between each... frustrating, isn't it? And it becomes 24 hours for larger areas, like the one above (it's about seven by five centimeters, 5mm in depth).

How is it useful?
For making puddles, small pools and such there is no better product within this price range. It's not dirt cheap, but in comparison with other water products it has one of the best price-to-quantity relation.

Also, if you're feeling adventurous, VSW can be used as the ultimate gloss varnish (if a very thick one). You can also try it when making things like drool, slime and such - it can be tinted with pigments or paint.

It will not work when you want flowing or choppy water. "Still" is the keyword here. However, it does not dry to a perfectly still, glass-like surface, it retains some very minute 'waves', making the water look more realistic.

Also, when poured onto a perfectly flat and level, non-porous surface like glass pane or a floor tile, it can be peeled off and cut when dry. I've never found any reason to use it like so, but it sure does have potential. Model window panes, maybe?

So, to sum up:

PROS:
  • Non-toxic, odorless, water-soluble and perfectly removable from clothes and such when still wet;
  • Decent price;
  • Ease of use;
  • Can be tinted with your usual miniature paint;
  • Can be drilled;
  • You get a lot of it in the bottle (but you also need a lot);
  • It doesn't 'go bad', I've had my bottle for at least three years now and it still works perfectly.
CONS:
  • Extreme shrinkage, you'll need multiple coats to get your water looking right;
  • Drying time;
  • It takes a while to get to know exactly how it behaves;
  • You can't model splashes and such with it, nor any sort of flow;
  • Sort of 'amateur' product - there are better ones out there, more expensive and more difficult to use, but ultimately yielding better results.
 On a final note, keep it out of direct sunlight. I lent mine to a friend who didn't and it turned milky in the bottle. It's not ruined like I'd feared it was, but it takes longer to become transparent on the model. Just a word of warning.

All in all, I don't discourage anyone from getting a go with the Vallejo Still Water. It's not perfect and if you are serious about your water projects, get a two-part clear resin or something by Woodland Scenics. If, however, you are like the most of us and use water areas sparingly on your bases, this is the product for you. VSW falls into the category of "might always come in handy".

Thanks for reading and see you Monday. Have a great weekend everybody!

Wednesday, November 2, 2011

Rebasing the arachnarok, part two - base details

Welcome to the second installment of my spider rebasing project. Today, I'll show you some details I'm adding to the base.

...like such. All of these are form wood elf plastic kits. After reading their newest fable, I thought it would be a nice idea to include some rune stones and the like in my army if it was going to be forest-themed. If ALL forests in the Old World are, supposedly, connected, it would be a nice hat tip to this.

Next, the brass etch fern fronds.

Difficult to work with, flimsy and delicate, but after putting them on the base you can hopefully see they look great. They will also be used on my next project, already in the works. If you give them a go, remember to varnish them and touch them as little as possible.

And lastly...
Cat tails! Nothing in my mind says "water" more than water vegetation. These were easy to make from a paper clip and some putty. Undercoat, paint, varnish, done.

Next time I'll be showing you how exactly have I put these on the base.

Saturday, October 29, 2011

Musings of a hobbyist - episode one

Welcome on a great, warm fall Saturday morning. Today I'm attempting something new. Click on the link, hear me out (it takes about 40 minutes) and that's it.

Musings of a hobbyist - episode one

As I promised, the links:

Micromark's seam scraper

Stahly's Tale of Painters

Feedback is much, much appreciated!

Wednesday, October 26, 2011

Rebasing the arachnarok, part one

Hello and welcome!

After doing my article on custom bases and building one for my giant, I haven't been able to shake the thought of rebasing my arachnarok spider as well. When bases of this size are hollow they are bound to be wobbly and very prone to warping. Besides, I knew I could make a base more in keeping with the rest of my army.

Here are some pictures of how I've done so far.

First of all, the milky effect on water will of course be gone by the time it dries, it just takes an awful lot of time. Secondly, this is what I like to call a 'flat' base, meaning all of the materials you simply glue on, like flock or static grass, are in place, but nothing that physically sticks out has been added yet. In this case, I mean fern, pieces of fallen trees, mushrooms and the like. I will most likely also add the odd goblin or some bones; bases of this size need very much material to liven them up.
In my opinion, water is always a nice touch to any large base, also because you don't see water effects on bases very often. Water is hard to do properly (I can only use the Still Water, and it's not very good as well) so few people try it. My pool will be much deeper than it is now, I just have to wait for the previous layer of Still Water to fully dry before adding the next one. It will take a good while, bearing in mind I like to be on the safe side and wait about 24 hours between each layer.

In the meantime, I'm working on other things for the base, like the ferns. I have a sheet of photo-etched ones that I have learned to work with, but once I'm out, I'll buy laser-cut paper ones. The photo-etched ones are ridiculously fragile and working with them taught me whole new depths of the meaning of patience.


I have no idea when I will be finished with this project, I can't even give you folks an estimate, mainly due to the Still Water drying, but after the night goblins it's nice to lay back with a 'relaxed' project like this one. I shall of course document my progress.

Until next time.

P.S.: A hat tip to Stahly of Stahly's Tale of Painters for mentioning my Liquid Green Stuff review in his list of, and I quote: "the best posts from our friends and fellow bloggers from the Tale of Painters Blog Network." Thanks you, my good sir.