Tuesday, May 15, 2012

Orc army project - the story so far

Hello folks. Recently the Miniworks hit 50 subscribers (51 now, even!) and I decided to post an orc army shot as a "thank you" to all you fellow miniworkers out there who happened to like my blog enough to visit it regularly.

Here you are, my current project so far:


  1. The arachnarok spider. First major airbrush job and by far the biggest model I've painted to date. Finished.
  2. Savage orcs. Twenty four badasses with varying weapons and poses. As the arachnarok was the biggest so these guys are the most ragtag project I've completed.
  3. Night goblins, fifty with a filler. Currently working on the last eight.
  4. Giant, specifically Bologs of the Albion Giants set. Wonderful model and the only metal one in the army. Completed.
  5. Mangler squigs. Completed. My favorite bit of this army so far.
  6. Boar boyz, currently on the workbench. Three finished out of ten planned.
  7. Wolf riders. Converted wolves, kitbashed riders. Second favorite unit.
  8. Savage orc shaman, converted. Possibly the first to be completed.
  9. Squig hoppers - planned. Oh, the plans I have for these boyz! You thought my savages are unorthodox, hm? Wait and see...
  10. Orc warboss on boar - planned. Will definitely convert the excellent Gorbad Ironclaw model.


There you have it. This project is nearing completion, but I'm completely unable to give you any dates.

Thank you for following Drazhar's Miniworks. Your support is in a considerable part what makes this hobby worthwhile.

Thursday, May 10, 2012

Orc boar boyz - grunt with spear #1

The first one's buddy. As previously, he still needs a shield, but other than that he is done.


What do you think?

Tuesday, May 8, 2012

Orc boar boyz - grunt with choppa #1

First finished member of the unit!


OK, not finished. He still needs a shield, but these will come at the very end.

Tuesday, May 1, 2012

Boar boyz get their rides

Almost there, just need to add the right arms on these guys.


I will definitely paint something else before I sit to the other five of these.


Thursday, April 26, 2012

Tutorial - orc skin done my way

Hey there. A couple of updates ago I told you I arrived at a formula of orc skin that really suits me, Here is how you go about doing it.

Before we begin - this is suited for tabletop, not showcase. You won't win any contests, but you won't be ashamed either.

You will need the following paints:

  • GW Knarloc Green
  • GW Goblin Green
  • GW Thraka Green wash
  • GW Devlan Mud wash
  • VMC Flat Green
  • GW Waywatcher Green glaze
  • optionally, a matte medium of your choice
Click to enlarge
  1. Basecoat the skin with Knarloc Green. Take your time, do a couple of thin coats.
  2. Wash the entire skin area with 2:1 mix of Thraka Green and Devlan Mud. After this dries, take your mix again and apply it to the deepest recesses only. Allow to dry.
  3. Re-establish your base color with Knarloc Green on anything that isn't a really deep recess. I strongly advise you to mix in some matte medium here.
  4. Begin highlighting the skin with a mix of 1:1:1 Knarloc Green, Flat Green and matte medium. Naturally, go a bit higher than the previous step. Orcs tend to have a very well-defined musculature, so this step should go really smoothly.
  5. Even higher! Now apply pure Flat Green. Concentrate on the muscle lines, tendons and so on. 
  6. Apply a final highlight of 1:1 Flat Green and Goblin Green. Head for things like muscle lines, knuckles, lips, noses and the like - the highest points.
  7. Finish it off with a glaze of Waywatcher Green. This is one of the best paints GW has produced - it ties the colors together like a dream, dries quickly and doesn't pool.

And that's the long and short of it. Simple and easy. See you next time!

Tuesday, April 24, 2012

Great Gork, a movie!

This is not something I usually do: I firmly believe and support original content. However, this fellow caught my interest as a whole, but with this move in particular. It's really interesting to hear. In fact, all of his movies are. He's somewhat difficult to listen to for some people, but what he says is to my mind worth hearing.


What are your thoughts on this?

Thursday, April 19, 2012

Boar boyz - riders WIP

The title says it all, really. Two shown, out of five.


I think I finally found an orc skin tone I am completely happy with. I know I've said that before, but this seems really it. I like it an awful lot and it's not hard to do at all.


What do you guys think?

Tuesday, April 17, 2012

Plans, wannabees, wishes and maybesometimes.

The other day I stumbled onto a peculiar post on the the book of faces, which you can see here (it's an awesome group by the way, if you don't know about Franz Sigmar's forum and projects, go and see them, it's really worth it). To make a long story short, the poster muses about making a themed ogre army, never mind the theme. For some reason, it got me thinking about my own projects, current, past and future.

I've always been a thinker more than a doer when it comes to Warhammer, mostly because I lack the space and the time to pursue each and every idea for an army that I have. But that doesn't stop me (and it shouldn't stop anybody) from having ideas. So, here is a run down of most of the things I came up with. Some of them might see realization, most of them probably won't, so feel free to  nick them if any one strikes your fancy.


  • A "lizardmen" army, with the 'under the sea theme'. Models from the ogre range mixed with tyranids (no legs!) and some reptile heads, basically something akin to the naga of Warcraft. Army list to use - Ogre Kingdoms.
  • A mercenary army. Long time ago there was an army book for the Dogs of War. It it, you could have found units as diverse as ogres, lizardmen, Chaos marauders and orcs, to name just a few, in one army list. This is what I've always envisioned a mercenary company to be: your race doesn't matter, as long as you're able and willing to fight. So, I'm thinking pikemen (of course!), some halflings, maybe even elves. Army list to use - The Empire.
  • A bretonnian force following an actual knightly order from the late middle ages, most likely from Spain. Knights of Santiago come to mind. 
  • A Mortis Engine and/or Coven Throne (from the VC army list) made from scratch. This actually might see fruition.
  • A winter-Egyptian themed Necron army.
  • A medieval-themed Space Marine force, most likely using the Space Wolves army list due to the abundance of close combat specialists there.
  • A dark eldar force with cybergoth aesthetics. Think very striking color contrasts and neon lights. As long as you see Tron with a much darker, sinister feel you won't go far wrong.
  • A plague-winter themed Vampire Counts or Tomb Kings army. 
  • A High Elf force with Oriental aesthetics. Think Ulthuan meets the 1001 Nights.
  • A Wood Elf army with a very strong 'folk' theme. Out with the misshapen treemen and dryads, and the wackily-armored elves we have now and in with centaurs, satyrs and so on. And hooded and cloaked archers, definitely.
  • And maybe even some Warmachine or Hordes!

There you have it folks. I'm sure I'm not the only one having more ideas than sense in this hobby. What do you think about these? Maybe you can share yours? Would love to hear from you.

Thursday, April 12, 2012

Product review - The Empire army book

Hello friendos! This comes a bit late, but the holidays have moved this review and there's not much I can do about it. But I eventually had laid my hands on the new Empire book and, well, read on...

As I've mentioned in my podcast, this is a very important release. The Old World finally has its new edition good guys and at the same time its most iconic human nation. The game now has one of its most appealing armies. Let's look at just what was changed and how.

The book itself is, again, not much different from four previous ones: hardcover, full color, semi-gloss. What I was particularly delighted about was the complete (or nearly so) lack of "art" by John Blanche. I know many of you love what this man is doing, well, I just don't. Not seeing a bit of it really made me smile.

In terms of fable not much is really new. Yes, we do have a new special character (a pretty typical lonely avenger type), but other than that the Empire's fluff hasn't advanced a bit. That is one of the things I was disappointed about (we'll get to the others in a moment). I really expected at least some bits to be developed, anything really. Karl Franz's new exploits maybe? Perhaps some development in the never-ending war with Chaos?

Well, none of this happened, but other things did - the rules of course. Most notably, the poor footslogging infantry got a great boost to the detachment rules. To make a long story short, the detachments now share the entirety of psychology rules their parent unit (now called the Regimental Unit) is bound by at any given moment. This is a great benefit to the basest of troops, it makes them somewhat more useful, reinforces 8th edition's "make-huge-armies" approach and does wonders to solidify the 'feel' of the Empire army.

Ah yes. The Feel. The Theme. Something I've always loved about the Empire and I'm sure I'm not the only one. What does the Empire actually have to counter all the threats it faces? Ordinary human soldiers are no match for the ferocity of Chaos. They will never outnumber the orcs. They will never outlive the elves or outmatch their weapons. So the men of the Empire resort to drill, synergy of the units, muster and pretty much everything that can give them an edge. This feel is prevalent throughout the book and is one of its greatest assets.

But getting back to the new stuff. The wizard contraptions are wacky, potentially very helpful and generally useful; I'm sure they will be found in most army lists. Yet while the rules are decent, the models are not to my liking - there is something like too much details, you know. And the omnipresent labels! "Sigmar" and "Karl Franz" are seen everywhere on these models. If I get my hands on one of these, I swear I will add "was here" to some of them... And the same goes for the War Altar.

The demigryph knights are by necessity powerful. Special choice, but definitely worth it. They, at least on paper, look very deadly. And also have halberds, which seems weird.

The Witch Hunter is possibly my favorite model in the new range. It's characterful, it's dynamic, it's great. And the rules are as well - this fellow can actually mark one enemy character as "heretic" and get several nifty bonuses (Sniper!) against him. Good stuff.

The Reiksguard are now a distinctively different choice in the list. They're special and they're Stubborn, differing from the 'ordinary' knightly orders, who are neither.

And with the Empire knights comes my greatest disappointment. Yes, the most obsolete and possibly worst looking miniatures GW makes remain unchanged. Luckily, the pistoliers and the demigryph riders  provide good alternatives and it's the only reason for leaving the knights set I can think of.

Oh, and the mortar is now S 2(6). As my buddy put it, "yeah, it lays the big template, but who gives a fuck now?" ...

However, these mishaps don't overpower the positive shine that the book exudes. The Empire is again a major player in the Old World. It's still desperate, it's still wacky, but now it also has that much needed kick here and there. It will be a pleasure to game with it and against it.

A very decent release, Games Workshop. You have my congratulations.

Tuesday, April 10, 2012

So you want to continue airbrushing?

Welcome to the final installment of my little airbrushing trilogy. Today we will look at actual miniatures and try to apply the techniques we've discussed to them.

If you look at this boar, you'll notice it has three main colors on it: light brown, dark brown and black (and some tan on the snout, but don't mind that now). These were applied from the lightest to the darkest on a light gray undercoat.

That approach serves three goals. Firstly, you can apply very diluted paint, making transitions and shades as easy as making or not making another pass with the same color. Secondly, there are no problems with coverage, as darker colors cover the lighter ones better than vice versa. Thirdly, once you get the hang of it, no mixing is necessary: in extreme cases (like batch painting twenty Space Marines or so) you can make the shading/highlighting just by applying more or fewer layers of the same color.

Of course, the painting does not end with airbrushing several layers. You still need to make the deepest shades and the lightest highlights. Airbrushing only takes care about the larger surfaces, but it does it very, very well.

On our boars, we achieve the fur texture by employing the easiest of techniques, but only after giving it the color proper by airbrushing. By combining the tried and true ink-then-drybrush routine on an already shaded and highlighted surface, we achieve a nice, naturalistic effect.

So, after all the browns and black were in place, I mixed some devlan mud and badab black in a 2:1 ratio. I applied this mix towards the boar's back, rather than its belly and head (and also on the fur near its hooves; by the way, it's high time someone actually told GW boars don't have horse-like hooves at all, they have four "fingers" - I mean, haven't they ever seen pork shanks?!). I diluted it, but only slightly, GW washes don't take diluting very well. I applied pure devlan mud nearer to the belly and head, and pure badab black nearer to the back.

To bring out the fur texture, I simply drybrushed the boar with VMC Beige, going against the "grain". I wanted the beige at the very tips of the hair, just to make an extreme highlight and make the texture pop.

After that it was just the matter of detailing.

To wrap things up, it has to be said that the airbrush will not make your life easier overnight. It is simply another tool, a very useful one, but still a tool. It will not, by itself, improve your quality of painting (undercoating and sealing aside, perhaps). It will simply broaden your arsenal. What you do with it is your choice.

I can hear the cries - what about masking? What about stencils? What about patterns?

Well, all I can say is that I'm still learning. Neither do I have the experience nor the materials to cover masking and stenciling properly. But these will come, sooner or later - that much I can promise.

Take it from here folks.

Thursday, April 5, 2012

Boar boyz - first batch of boars

Here they are. Gorgeous models if you ask me.


Of course five are done, these are just samples. To maintain the ragtag appearance of the unit of ten, the other five will be done in a different color scheme. I'm thinking black.

The riders are another matter altogether. I can't give any estimates when will I even begin working on them.

Until next time!

Friday, March 30, 2012

Important - lack of updates

The dead period this passing week stems from unforeseen circumstances, having an M, an E and a 3 in their name...

...regular updates resume next week. Thank you for understanding.:)

Thursday, March 22, 2012

Little Owl Paints - Baerwyn, Elf Archer finished


Here he is, my significant other's first miniature. She started (and finished) him before the paladin lady.


It has been great to watch her work. I rarely see anybody with that level of concentration; she's like that with everything she does.


 I think the pictures speak for themselves here. She is very close to surpassing me.


The only thing I've actually done on the miniature - the base:


What do you think, Internet?

Tuesday, March 20, 2012

Little Owl Paints - Baerwyn, Elf Archer PIP

My beloved's another project. She seems to enjoy Reaper miniatures very much.


In her own words: "I couldn't paint an army. It's so repetitive". 

Stay tuned for the finished elf.

Thursday, March 15, 2012

So you still want to start airbrushing?

So you've gone out, got yourself the tools. You have your airbrush, your compressor, some paint, cleaning equipment. Now what?

"Well, paint with it?" would be the most obvious answer, but hold on. We will get to painting eventually. Today, we'll focus on how the airbrush works. And there will be homework.

So:

  1. Nozzle. The part that is nearest to your work piece and also the one you will care about the most. On the picture the nozzle itself is not visible; it's a very, very tiny funnel in which the needle's point sits. Just behind the nozzle the paint and air mix together, and by retracting the needle the nozzle is opened, allowing the spray to happen. Unscrew the needle guard for a very thin line; this is essential for detail work.
  2. Air valve. Here the magic begins. By controlling how much air gets into the mixing chamber different effects can be achieved. The rule of thumb is that the thinner the paint, the less air it needs to spray. This also controls the thickness of the line you produce when painting. When undercoating and varnishing (and cleaning) open the valve all the way. When actually painting, tighten the screw as you see fit. This, as with all things, requires practice, but is quite easy to grasp: if your paint spills, you need less air, if the nozzle clogs or paint starts spraying in droplets, you need more.

    Be careful with low air amounts: the lower you go, the sooner the nozzle clogs. It's inevitable.
  3. Trigger. It works in two ways: when depressed, it opens the airflow. No control happens here, it's merely a flow/no flow action. When pulled, the needle is retracted and paint is released into the mixing chamber. Combine both of these and you will have what airbrushes are supposed to do.

    This is the most vital part to practice. The amount of paint released is essential. You can control it better with the screw under point 5, but when practicing, unscrew it all the way and control the trigger only with your finger.
  4. Paint container. Easy as that.
  5. Needle screw. By tightening or loosening it you control how far the trigger (and hence the needle) can be retracted and how much paint is flowing. Some airbrushes actually have a scale printed here, which is very helpful. As with the air valve, when cleaning, open it all the way. However, when undercoating or varnishing it is tempting to allow more paint to flow - be careful with this. It's all too easy to make a spillage. Two or three thin coats are better than a single thick one - and the airbrush covers wonderfully thinly.

Alright. That's the long and short of it. Now practice.

Get yourself some white foamboard. It goes for dirt cheap at art supplies stores. This will be your practice sheet. Here is mine:
For your very first encounter with the airbrush, don't use paint, just tint some water. See how it behaves, how flows, how it reacts to different pressures and amounts released.

Remember, an airbrush is not a brush! It does not touch your material - distance between them is a factor!

As for the promised homework, do the following:
  • doodle, simple as that
  • draw a straight line
  • draw some parallel lines. Try to be as neat as possible.
  • draw a circle, again, as perfect as you can
  • draw a spiral
  • draw a triangle
  • draw a rectangle or square
  • draw the thinnest line you can
  • fill your triangles and squares with a gradient.
Got it? Great. See me here next week for your reward. Thanks for reading!

Tuesday, March 13, 2012

Little Owl Paints - Shaedra, Female Paladin PIP #2


Painting is more or less finished. Now for the base.


From what I gather, she has some very special plans for basing. I've heard something about a frozen lake? A hillock? Blackthorn bushes?

Whaddaya think?

Thursday, March 8, 2012

So you want to start airbrushing?

Before we begin - this will not be a guide written by a master for beginners. I'm far from being a master of an airbrush. But I am a self-taught practitioner of it and some of the things I've learned myself I was not able to find in any of the guides I'd read. And I read a lot.

So, you want to start your adventure with the airbrush? Good for you. Great, even. The airbrush is an awesome, versatile tool. It will perform some amazing jobs, you will be, eventually, able to achieve some great effects.

But it has a learning curve. It is a sizable investment. Also, some people dismiss it entirely as a "get-done-quickly" kind of tool. Some even go as far as to compare its usage to dipping the models in wood polish. World-view and idiosyncrasies aside, I've found the airbrush to be useful at first and indispensable afterwards.

So, let's go over the basics. I'm not going to explain terms like single-/double-action or feed type, you can easily find these in other sources and you're bound to have heard them if you want to buy an airbrush. Instead, let's focus on the usage.

First things first - get a double action, gravity feed airbrush. These are more expensive than single action ones (the Citadel spray gun being a notable exception), but they will perform all the tasks single-actions are capable of and more. Paasche and Harder & Steenbeck are very good brands that still maintain a decent price for some of the simpler models. Don't go into the high end at first, even if you can afford it: Iwata, for instance, is out of the question for beginners in my opinion. If you have money to spend, get a compressor. Some companies sell starter sets: an airbrush and some basic paints. These are usually a very good option. I know Vallejo does this.


Get a dedicated air compressor for airbrushing. This is the part that turns most people away from airbrushing altogether. Don't bother with canned air, it's a huge waste of money. Compressors can be a bit noisy and they are pricey, but in the long run they pay off several times their worth. After you get the hang of airbrushing and want to do it more, you can go for a more powerful, industrial compressor with a bigger air tank, but that's way ahead on the road. Stick to dedicated compressors for airbrushing for now.


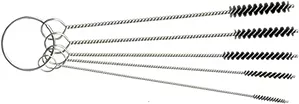
Nozzle cleaner. Your airbrush will love you.
Get yourself a set of proper cleaning tools: a paint remover/airbrush cleaner, a nozzle cleaner and some cleaning wires. Airbrushes need maintenance and care. They need regular cleaning and they will perform admirably for a long time, even the Chinese "pseudo-Iwatas".


The cleaning wires are a necessity. Once in a while it is simply obligatory to disassemble your airbrush and clean it thoroughly. Paint can gather in the weirdest of places, but the wires, with the aid of an airbrush cleaner, will get to these places.


The cleaning station falls under the "not necessary, but very handy" category  It's essentially a fancy glass jar, but it prevents your workstation from getting uber-messy when cleaning the airbrush and your body from inhaling all these great fumes of paint thinner. It also doubles up as a great airbrush holder and a water pot. It works like a filter - you pour water into the jar, screw on the lid and put your airbrush into the rubber-rimmed hole. When you clean the 'brush, the bad stuff stays in the water and doesn't flow away. Really, a very handy piece of equipment and - in comparison with the rest - a pretty inexpensive one to boot.


Paints, duh. Dedicated brands for airbrushing exist; Vallejo Model Air comes to mind as the most prominent, but there are many others, not only acrylic. My advice is to get one or two colors of airbrush paint to get the idea of how the dilution and saturation should be. You can of course use normal paints (and primers, and varnishes, and alcohol for pigment sealing) in airbrushing, therefore paint thinner is an absolute must. As far as priming goes, Vallejo (I swear, they don't pay me a dime!) makes a great primer in a couple of interesting colors. And the best part is you don't need to dilute it! 


As a final note before we get to actual painting practice: the above seems like a lot, I know. It is a big amount of stuff. But airbrushing is just one of those things that you have to invest a lot into at the beginning, but lesser and lesser so as you progress. I've purchased all of these over the period of two years, always thinking "why the hell haven't I done it sooner?!".

Next time, we'll go over the basics of actually painting something. Stay tuned!

LEGAL DISCLAIMER: All the images used are copyright of their respective owners. Used without permission for demonstrative purposes only. No challenge to their status is intended.

Tuesday, March 6, 2012

Little Owl Paints - Shaedra, Female Paladin PIP

...Little Owl being what I call my girlfriend. Don't ask.
See, she's got her own artist's mark! ;)
Rather, take a look at her work. She has taken a great liking to this mini by Werner Klocke, and, well, is very diligent in painting it to the best of her ability.


Has she done a good job so far? You be the judge.


I know for a fact she has her prying eyes on Heinrich Kemmler next.